The critical question for a vintage pearl hunter isn’t “is it real?”, but “is it a sound investment or a beautiful liability?”.
- Authenticity tests like the “tooth test” are unreliable against modern fakes and reveal nothing about a pearl’s structural integrity.
- The true cost of a vintage piece includes non-obvious expenses like professional restringing (£50+) and auction house premiums (up to 30%+VAT).
Recommendation: Shift your focus from simple authentication to a tactile and visual diagnosis of nacre health, clasp originality, and thread condition before you buy.
The dusty corner of a British antique shop, the thrill of a provincial auction—for the vintage hunter, these are battlegrounds of opportunity. You spot a classic strand of pearls, glowing softly under the dim light. The price seems reasonable. But as you handle them, a dozen questions flood your mind. Are they Akoya or common Freshwater? Is that lustre genuine or a clever coating? You’ve heard the common advice: rub it on your tooth, check if they’re perfectly round. These are the platitudes of pearl hunting, tips that barely scratch the surface and often mislead.
The world of vintage pearls is far more nuanced than a simple real-versus-fake dichotomy. A pearl can be “real” but structurally compromised, its nacre worn thin, its silk thread decaying. It can be a genuine antique with a cheap replacement clasp that halves its value. The challenge isn’t just spotting a treasure; it’s avoiding a costly restoration project disguised as a bargain. This requires moving beyond folklore and adopting the discerning, tactile approach of a professional grader.
But what if the key wasn’t in memorising a checklist, but in learning to read the story a pearl tells through its subtle imperfections? This guide abandons the generic advice. Instead, we will delve into the structural integrity of a pearl, decode the language of its wear and tear, and uncover the hidden costs that lurk behind every hammer price and price tag. We will teach you to feel the difference between surface dirt and permanent decay, to recognise the ‘blink’ of a dying pearl, and to see a £50 restringing fee not as a cost, but as a crucial part of your investment calculation.
This journey will equip you with the practical knowledge to assess vintage pearls with confidence. From the gritty truth about the tooth test to the financial realities of UK auction houses, you will learn to evaluate a piece’s past, present, and future value.
Contents: A Discerning Guide to Vintage Pearl Assessment
- The Tooth Test: Is Gritting Pearls Against Teeth Hygienic or Accurate?
- How to Spot ‘Blinking’ or Peeling on Old Cultured Pearls?
- Why You Must Factor £50 Restringing Cost Into Every Vintage Pearl Purchase?
- The ‘Dead’ Pearl: Can You Restore Lustre to Perfume-Damaged Gems?
- How to Date a Pearl Necklace by Its Gold Clasp Style?
- Why Winning an Auction for £500 Actually Costs You £650?
- Hair Work in Lockets: Macabre or Romantic History?
- Restringing Gemstone Chokers: How Often Should You Re-thread Tight Necklaces?
The Tooth Test: Is Gritting Pearls Against Teeth Hygienic or Accurate?
The tooth test is the most widely cited method for authenticating pearls, but it is a tool of limited, and often misleading, utility. The theory is that a real pearl’s nacre, composed of microscopic crystalline layers, will feel slightly gritty against the tooth’s enamel, while a glass or plastic fake will feel perfectly smooth. While this can help distinguish the most basic fakes, it’s far from foolproof and raises obvious hygiene concerns, especially in a market or antique fair setting. You are, after all, placing an object of unknown history in your mouth.
The primary flaw in this method is its inability to identify more sophisticated imitations. Modern manufacturing techniques have produced composites that can easily deceive the untrained touch. For instance, shell pearls, which are made from a core bead coated in a composite of ground mother-of-pearl, can feel gritty and pass the test. A conclusive expert analysis reveals that these fakes mimic the surface texture of genuine nacre very effectively, rendering the tooth test unreliable for a serious buyer. Relying on it is like trying to value a painting by smelling the canvas.
A discerning buyer must move beyond this primitive test and adopt the methods of a professional. The focus should be on a multi-faceted examination that assesses weight, structure, and surface characteristics. A far more discreet and effective alternative to the tooth test is to gently rub two pearls from the strand together. Real nacre will produce a faint, fine powder and a distinct gritty resistance, a tactile sensation that is difficult for fakes to replicate. This provides the same textural information without the questionable hygiene.
Your Action Plan: Professional Pearl Authentication
- Weight Test: In your hand, feel the weight. Real pearls, due to the density of their nacre, feel surprisingly heavy for their size compared to the tell-tale lightness of plastic or glass imitations.
- Drill Hole Inspection: Use a 10x jeweller’s loupe to examine the drill holes. You should see the sharp, defined edges of layered nacre. Fakes will often have a smooth, moulded look or show signs of the coating chipping around the hole.
- Nacre-on-Nacre Rub Test: Gently rub two pearls together. Authentic pearls will create a subtle friction and leave a fine, powdery residue. Fakes will glide smoothly against each other.
- Surface Uniformity Check: Scan the entire strand. Real pearls are a product of nature and will exhibit slight, almost imperceptible variations in shape, size, and surface. A strand where every pearl is identical is a major red flag for imitation.
- UV Light Test: If you have access to a UV light, observe the pearls’ reaction. Many, though not all, real pearls will exhibit a soft, subtle fluorescence, whereas many fakes will be inert or glow with an unnatural uniformity.
How to Spot ‘Blinking’ or Peeling on Old Cultured Pearls?
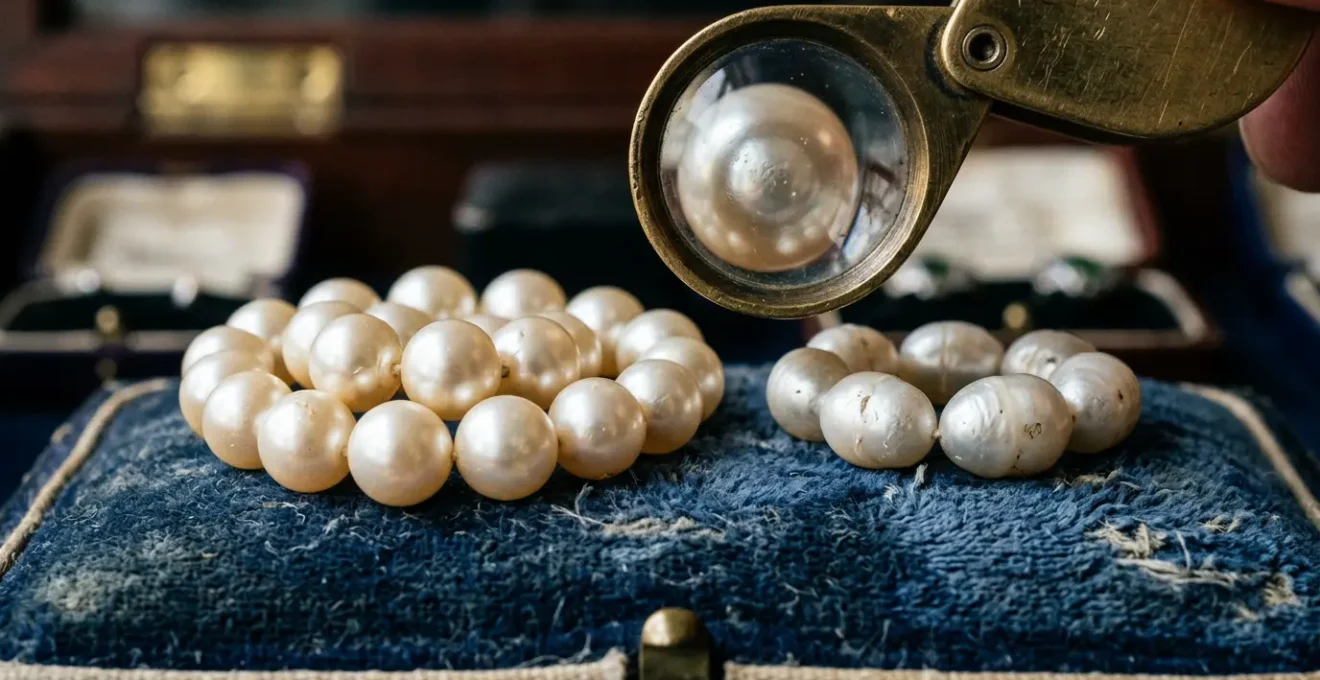
‘Blinking’ is a term used by graders to describe one of the most serious forms of wear on a cultured pearl. It occurs when the outer layer of nacre has worn so thin that the dark, mother-of-pearl bead nucleus underneath becomes visible. It presents as a dull, shadowy patch on the pearl’s surface that seems to “wink” or blink at you as you rotate it in the light. This is not dirt; it’s a sign of irreversible nacre fatigue and significantly diminishes the pearl’s value. Peeling, where the nacre chips or flakes away, is an even more advanced stage of this degradation.
This issue is particularly prevalent in older cultured pearls, especially those from the mid-20th century. The analysis of vintage Mikimoto necklaces from the 1960s shows that early culturing techniques often resulted in thinner nacre layers compared to modern standards. While these pieces can be highly valuable, their worth is directly tied to the thickness and condition of their nacre. A strand with even one or two ‘blinking’ pearls near the clasp—an area of high friction—is a compromised investment.
To spot this defect, you need good light and a keen eye. Hold the strand and slowly rotate each pearl, watching for any areas where the lustre abruptly disappears and is replaced by a dull, darker undertone. It often looks like a small, permanent shadow that doesn’t move as the light source does. Pay extra attention to the pearls on either side of the clasp, as this is where wear from skin oils and movement is most concentrated.
As the visual guide above demonstrates, blinking is distinct from simple scratches or a loss of overall lustre. A scratched pearl can sometimes be polished, and a dull pearl can be cleaned, but a blinking pearl has lost its fundamental structure. There is no way to add back the nacre. For a vintage hunter, spotting this is crucial: it’s the difference between buying a restorable classic and an item in terminal decline. A piece with significant blinking or peeling should be priced accordingly, or avoided altogether.
Why You Must Factor £50 Restringing Cost Into Every Vintage Pearl Purchase?
When evaluating a vintage pearl necklace, the pearls themselves are only half the story. The thread that holds them together is the unsung hero, and its failure can lead to catastrophic loss. Most vintage pearls are strung on silk thread, which, over decades, degrades. It stretches, frays, and absorbs skin oils, dirt, and perfume, weakening its structure from the inside out. Assuming the original stringing is sound is one of the most expensive mistakes a novice buyer can make. Therefore, a professional restringing fee—typically starting around £50-£80 in the UK—should be mentally added to the purchase price of almost every vintage strand you consider.
Viewing this cost as a mandatory investment rather than an optional repair is critical for risk management. A proper restringing does more than just replace the thread; it involves professionally knotting between each pearl. This is a vital security feature. As UK antique valuations expert Vernon Ward notes, this technique provides crucial insurance against total loss.
With proper knotting between each pearl, if the strand breaks, you lose at most one pearl rather than watching your entire investment scatter across the floor.
– Vernon Ward, UK Antique Valuations Expert
The process of restringing also provides an invaluable opportunity for a full health check of your new acquisition. A skilled stringer will inspect each pearl individually as they work, identifying any with chipped drill holes or early signs of blinking that you might have missed. They will also assess the clasp’s security, ensuring the jump rings are soldered and the mechanism is sound. This small, upfront investment not only secures your necklace for years of wear but also provides a definitive assessment of its structural integrity, turning a potential liability into a secure asset.
The ‘Dead’ Pearl: Can You Restore Lustre to Perfume-Damaged Gems?
The beautiful, deep lustre of a pearl is organic and fragile. When that glow gives way to a dull, chalky, and lifeless appearance, the pearl is often described as ‘dead’. This is not a formal gemological term, but a visceral description of a pearl that has suffered irreversible chemical damage. The most common culprit is long-term exposure to acids found in perfumes, hairsprays, and even skin oils. Unlike a dirty pearl that can be cleaned, a dead pearl cannot be revived. Its lustre is gone forever.
This type of damage is frequently seen in inherited collections. A common observation is that “a few appear a bit yellow coloured,” especially near the clasp. This discolouration is often a sign of permanent protein degradation within the nacre, caused by decades of fragrance application to the neck and wrists. These ‘dead’ pearls are a testament to how the piece was worn and cared for (or not cared for) by its previous owners. The damage is cumulative and, once the conchiolin protein that binds the nacre’s crystals is eroded, there is no professional polish or cleaning solution that can restore the original orient.
As a buyer, you must learn to differentiate between a pearl that is merely dirty, one that is slightly dull from surface scratches, and one that is truly dead. A simple wipe with a soft, damp cloth will instantly reveal if the issue is just surface grime. If the lustre returns, you have a healthy pearl. If it remains dull, closer inspection with a loupe might reveal micro-scratches that could potentially be lessened by a professional jeweller. However, if the surface appears matte, porous, and chalky, and does not respond to gentle cleaning, you are looking at permanent damage. No amount of money or effort will bring it back to life.
Diagnostic Guide: Dirty vs. Dull vs. Dead Pearls
To assess the condition, follow this sequence. First, perform the Dirty Pearl Test: wipe the pearl with a clean, damp, soft cloth. If the original lustre and shine return, the issue was simply an accumulation of surface oils and dirt. If it remains lackluster, proceed to the Dull Pearl Assessment: examine the surface under magnification for a web of fine micro-scratches. This may indicate the pearl could benefit from professional polishing. Finally, to identify a Dead Pearl, look for a persistent chalky, matte surface that shows no improvement after cleaning. This indicates permanent chemical damage. If in doubt, always seek a professional jeweller’s opinion before attempting any restoration. In some cases, dead pearls near the clasp can be removed, allowing a jeweller to shorten the strand while preserving the value of the remaining healthy pearls.
How to Date a Pearl Necklace by Its Gold Clasp Style?
While the pearls themselves rarely offer definitive clues to their age, the clasp is a time capsule. It is often the single most reliable element for dating a vintage necklace. Jewellery design, materials, and manufacturing techniques evolved dramatically through the 20th century, and clasp styles reflect these changes. An original, period-appropriate clasp can significantly increase a piece’s value, while a later replacement can diminish it. Learning to recognise these styles is like learning to read a hallmark—it unlocks the piece’s history.
The journey through clasp styles is a tour of design history. Ornate, engraved box clasps in yellow gold are characteristic of the Victorian and Edwardian eras. The Art Nouveau period favoured flowing, asymmetrical designs, often incorporating whiplash curves. This gave way to the sharp, geometric forms of the Art Deco era, where platinum and white gold were paired with filigree work and small diamonds in fish-hook or spring-ring clasps. The mid-century saw a return to warmer yellow gold, with larger, more substantial and often decorative clasps becoming a feature in themselves. By the 1970s, simpler, more modern and functional designs became commonplace.
Beyond the overall style, the true key for a UK-based hunter lies in the hallmarks. If the clasp is British-made and crafted from a precious metal, it should bear a series of small, stamped marks. These are your most precise dating tool. According to UK valuation experts, British assay office hallmarks can provide dating accuracy to within a single year for pieces made after 1875. A jeweller’s loupe is essential for this work. You’ll be looking for a mark indicating the standard of the metal (e.g., ‘375’ for 9ct gold), the symbol of the assay office (e.g., a leopard’s head for London), and, most importantly, the date letter. Each year was assigned a specific letter in a unique font and shield shape, providing an undeniable certificate of age for the clasp, and by extension, a highly probable age for the entire piece if it appears to be original.
Why Winning an Auction for £500 Actually Costs You £650?
In the exhilarating environment of an auction, it’s easy to get caught up in the winning bid, known as the ‘hammer price’. However, for the unprepared buyer, the final invoice can come as a significant shock. The hammer price is merely the starting point of your total expenditure. In the UK, auction houses add a series of non-optional fees that can inflate the final cost by a substantial margin. Forgetting to factor in these ‘hidden costs’ is a classic rookie error that can turn a perceived bargain into an overpriced purchase.
The most significant addition is the Buyer’s Premium. This is a percentage of the hammer price charged by the auction house for their services. This rate is not standardized and varies significantly, but typically ranges from 25% to 30% for major UK auction houses. On top of this premium, you must also pay Value Added Tax (VAT), which is calculated at 20% of the premium amount, not the hammer price. Furthermore, if you are bidding online through a third-party platform, an additional online bidding fee, often between 3% and 6% of the hammer price, may also apply. The UK’s Advertising Standards Authority (ASA) has even ruled against auction houses for not making these non-optional charges clear enough, deeming it misleading to consumers.
Let’s break down the real-world impact. If you win a strand of pearls with a hammer price of £500, the calculation is not straightforward. The total cost is the sum of the hammer price and all applicable fees. This is a critical piece of financial planning for any serious auction-goer.
Here is a typical breakdown of the total cost based on common rates at UK auction houses, sourced from industry leaders like Bonhams, which outlines a buyer’s premium and associated taxes.
| Cost Component | Typical Rate | On £500 Hammer | Notes |
|---|---|---|---|
| Hammer Price | Base | £500 | Winning bid amount |
| Buyer’s Premium | 25-30% | £125-£150 | Varies by auction house |
| VAT on Premium | 20% of BP | £25-£30 | Added to buyer’s premium |
| Online Bidding Fee | 3-6% | £15-£30 | If bidding online |
| Total Cost Range | – | £665-£710 | 30-42% above hammer |
Hair Work in Lockets: Macabre or Romantic History?
Discovering a vintage locket or brooch that contains intricately woven hair can be a startling experience for the modern collector. Is it macabre? Or deeply romantic? The answer lies in the context of the 19th century. In the Victorian era, before photography was widespread, hair was a powerful and tangible link to a loved one, either living or deceased. This ‘hair work’ was a popular and sentimental art form, creating deeply personal keepsakes known as ‘mourning jewellery’ or ‘sentimental jewellery’.
These pieces were not seen as morbid but as a profound expression of love, remembrance, and grief. Pearls were central to the symbolic language of this jewellery. Small, delicate seed pearls were often used to frame the hair compartment, where they were intended to represent the tears shed for the departed. This combination of human hair and ‘tears’ of the ocean created a potent memento mori. According to antique appraisers, the rarity and historical significance of these items mean that 1940s-1950s pearl strands now valued at £800+ at appraisal events, and mourning pieces command even higher interest from specialist collectors.
The value of these pieces today is driven by several factors: the intricacy of the hair work, the condition of the pearls and metalwork, and the presence of any inscriptions or hallmarks that can trace its history. A piece that combines a lock of hair with a graduated pearl border and a fully hallmarked gold setting is a highly collectible artifact. It tells a story of personal connection from a bygone era. For a vintage hunter, finding such a piece requires looking past modern sensibilities and appreciating it for what it was: a cherished and intimate memento. They are not just jewellery; they are fragments of social history, and their value reflects this unique status.
Key Takeaways
- Focus on structural integrity (nacre thickness, thread condition) over simple “real vs. fake” tests.
- Always factor in “hidden costs” like a £50-£80 restringing fee and up to 40% in auction premiums when calculating your budget.
- Learn to distinguish between reversible issues (dirt) and irreversible damage (blinking, dead pearls) to avoid costly mistakes.
Restringing Gemstone Chokers: How Often Should You Re-thread Tight Necklaces?
The need for regular maintenance is not exclusive to pearls. Gemstone chokers, especially those worn tightly against the neck, are also subject to significant wear and tear that can compromise their security. While the gemstones themselves are often harder than pearls, the thread holding them is just as vulnerable. The frequency of restringing depends on the material of the stones, the type of thread used, and how often the piece is worn. Neglecting this maintenance is to risk the same sudden breakage and loss as with a pearl necklace.
The primary risk factors differ slightly. For pearl chokers worn weekly, the main culprits are the degradation of the silk thread from absorbing skin oils and chemicals. This is why annual restringing is often recommended for frequently worn pieces. For hardstone chokers, such as those made of agate, quartz, or garnet, a key issue is the abrasion between the stones themselves. The sharp edges of the drill holes can slowly saw through the thread over time. Porous stones like turquoise present another challenge, as they can absorb oils and pollutants, which can then transfer to and weaken the thread.
A general rule is to have any frequently worn choker inspected by a jeweller every six to twelve months. They can spot early signs of trouble, like stretched thread or discoloured knots, before a failure occurs. The timeline for restringing varies, but a proactive approach is always wisest. A tightly-worn pearl choker may need it annually, while a hardstone choker worn with the same frequency might last three to five years. It’s a small investment to protect a much larger one.
Your Action Plan: Critical Inspection Points for Vintage Chokers
- Thread Visibility: Gently push two beads apart. If you can see the thread between them, it’s a dangerous sign of stretching and thinning. The knots should be tight against the beads.
- Elasticity Test: Hold the choker and give it a very gentle pull. A healthy, well-strung necklace will have no give. If it feels stretchy or doesn’t spring back, the thread has lost its integrity.
- Knot Discoloration: Examine the knots with a loupe. If they are dark, grey, or greasy-looking, it indicates a heavy absorption of oils and dirt, which is weakening the fibres.
- Bead Rotation: Check if any beads or pearls can rotate freely on the thread. This suggests the knots have compressed and loosened, increasing friction and wear on the thread.
- Clasp Attachment Points: Pay close attention to the thread where it attaches to the clasp. These are the highest stress areas and are often the first points of failure. Look for fraying or thinning.
Now equipped with the discerning eye of a grader, your next visit to an antique market or auction will be different. You will look beyond the surface gleam and assess the true, underlying value of each piece. To put these skills into practice, the next logical step is to confidently evaluate a piece, calculate its total potential cost, and make an informed offer.