Securing a high-value diamond stud is not about choosing a single ‘best’ back, but about designing a complete system that manages weight, friction, and mechanical integrity.
- Low-profile ‘martini’ or ‘basket’ settings are more crucial than the back itself, as they shift the center of gravity to prevent drooping and snagging.
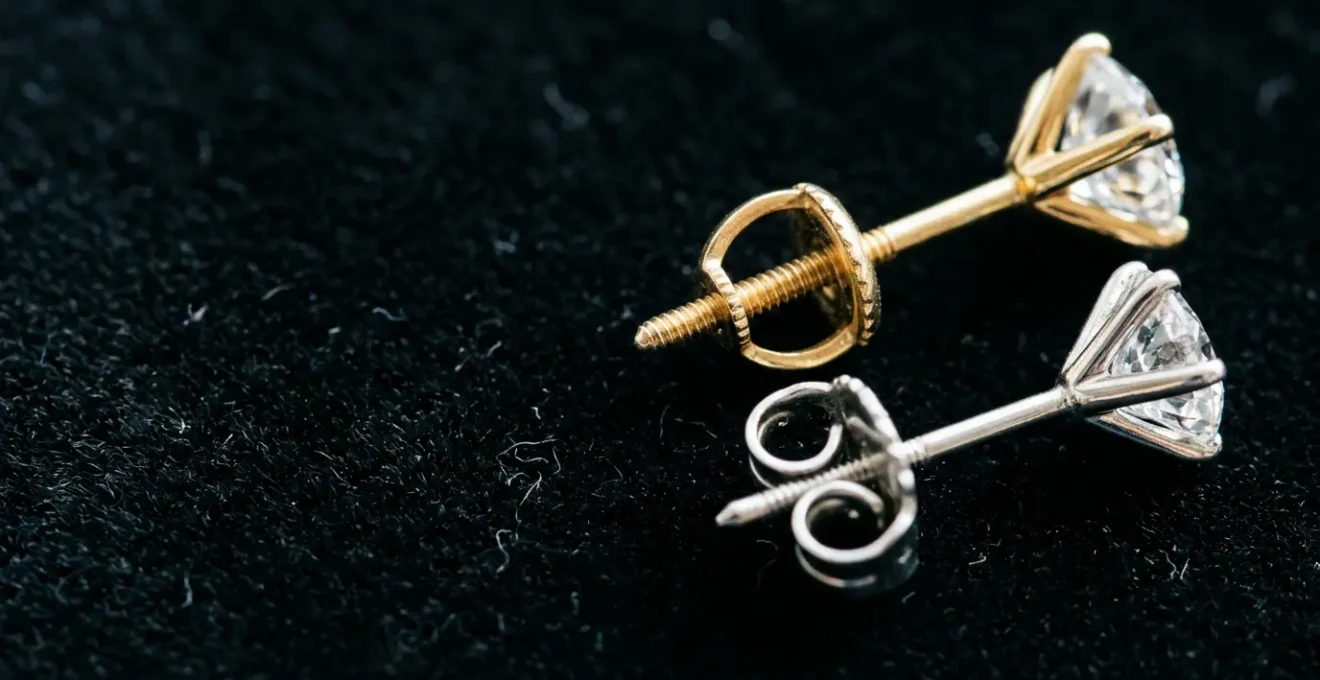
- For active locking, ‘La Pousette’ (Alpha) backs offer superior, confirmed security over the passive resistance of screw backs, which can loosen silently.
Recommendation: Prioritise a low-profile setting first, then pair it with a La Pousette (Alpha) or secure screw back for a truly comprehensive security solution.
The moment of panic is unforgettable: a hand brushing against your ear while taking off a scarf, a quick check in the mirror, and the gut-wrenching realisation that a significant investment is simply gone. For anyone who owns or aspires to own high-value diamond studs—especially those of 1 carat or more—this fear is a constant companion. It transforms a symbol of elegance into a source of anxiety. The conversation around earring security almost always devolves into a simple, binary debate: the traditional butterfly back versus the seemingly robust screw back. But this misses the point entirely.
From a security specialist’s perspective, focusing only on the fastening is like securing a vault door but ignoring the walls. True peace of mind comes not from a single component, but from a holistic understanding of the physics and engineering at play. The real vulnerabilities lie in the interplay between the diamond’s weight, the setting’s design, the earlobe’s characteristics, and the back’s mechanical function. A poorly balanced stud will create problems no backing can solve, while a well-engineered system provides layers of protection against the primary risks of gravity and friction-induced loss.
This guide moves beyond the simplistic debate. We will deconstruct the entire security system of a diamond stud. We’ll analyse how the stud’s center of gravity is the real culprit behind drooping and snagging, explore the mechanical advantages of advanced fastenings, and provide a framework for making choices that ensure your precious studs remain exactly where they belong. It’s about replacing anxiety with the quiet confidence that comes from a well-engineered solution.
To navigate this complex topic with clarity, this article breaks down every critical component of diamond stud security. The following sections will guide you through the key considerations, from the physics of the setting to the long-term care that preserves both value and brilliance.
Contents: The Definitive Guide to Securing High-Value Diamond Studs
- Drooping Lobes: How Large Can You Go Before the Stud Tips Forward?
- The ‘Alpha’ Back: Is It Really the Most Secure Earring Fastening?
- Why You Should Prioritise Colour Over Clarity for Diamond Studs?
- The Hairspray Film: Why Your Diamond Studs Look Cloudy After a Week?
- How to Choose Low-Profile Settings for Sleeping Comfort?
- Ruby or Sapphire: Which Gemstone Pops on Cool Undertones?
- Can You Polish Scratches Out of a Ruby While It Is Still Set?
- Marquise and Pear Cuts: How to Protect Fragile Points from Chipping?
Drooping Lobes: How Large Can You Go Before the Stud Tips Forward?
The single most overlooked factor in stud security is not the back, but the physics of the setting itself. For studs of 0.75 carat and above, the diamond’s weight creates significant forward-pulling torque. If the center of gravity is too far from the earlobe, the stud will inevitably tip forward. This “droop” not only looks unflattering but also creates a gap between the setting and the ear, making it far more susceptible to snagging on hair, clothing, or a scarf.
The solution lies in choosing a low-profile setting. Traditional 4-prong settings often hold the diamond high and away from the ear. In contrast, “basket” or “martini” style settings are designed to position the diamond’s mass as close to the earlobe as possible. This engineering choice is critical. A study on setting physics found that moving the center of gravity back by 40% can reduce the forward droop by half. Martini-style settings, with their conical shape, are particularly effective as they naturally direct the weight back towards the piercing.
However, the setting is only half of the equation; your earlobe’s own structure is the other. Thinner or less elastic lobes simply cannot support the same weight as thicker, denser tissue. Before investing in large studs, it’s crucial to understand your personal threshold. Assessing your lobe’s thickness and elasticity provides a reliable guide to selecting a diamond size that will sit beautifully without causing strain or drooping, ensuring both comfort and security.
Your 5-Point Earlobe Test for Droop Threshold
- Gently pinch your earlobe between your thumb and forefinger to assess its thickness. Lobes thinner than 6mm require lighter studs (under 0.75ct per ear) or significant back support.
- Pull your lobe down slightly while pinched. If it stretches easily by more than 5mm, your lobes have high elasticity and you should limit stud size to 0.5ct per ear to avoid stretching the piercing over time.
- Press the lobe firmly and release. A quick spring-back indicates denser tissue that can comfortably support studs up to 1ct or slightly more, especially with the right setting.
- Test with your existing heaviest earrings. If they already droop, your next pair of studs should be at least 25% smaller in carat weight to compensate.
- For thin or elastic lobes, proactively consider oversized disc backs or La Pousette systems, as their counterweight and support are essential for distributing the load.
The ‘Alpha’ Back: Is It Really the Most Secure Earring Fastening?
Once the setting’s center of gravity is optimized, the focus shifts to the fastening mechanism. While screw backs are often touted as the ultimate security solution, they represent a form of passive security. Their effectiveness relies solely on the friction of the threads, which can and do loosen silently over time with micro-movements. You have no confirmation of their status until you manually check them. For an anxious owner, this provides little daily reassurance.
Enter the La Pousette back, often known by brand names like Alpha. This is a form of active security. It operates via a spring-loaded clutch mechanism that grips a specially notched post. To release it, you must depress two external buttons simultaneously. This design offers two distinct advantages: it provides an audible “click” upon closing, confirming a secure lock, and it cannot work itself loose through friction or vibration. Its primary mechanical failure point is spring fatigue, but this typically occurs only after many years of heavy use, unlike the metal fatigue that can weaken a standard butterfly back in just one or two years.
Comparing these premium options reveals a trade-off between different security philosophies. The screw back is simple and robust but requires diligent monitoring. The La Pousette is a more complex piece of engineering that provides active, confirmed locking, offering a higher degree of anxiety relief for the wearer. For high-value studs subject to daily wear, the confirmed lock of an active system is, from a risk-mitigation standpoint, superior.
The following table, based on retention data and user feedback, provides a clear comparison of the most common premium earring backs, highlighting their distinct advantages and vulnerabilities.
| Back Type | Mechanical Security | Anxiety Relief Score | Failure Point |
|---|---|---|---|
| La Pousette (Alpha) | 95% retention | 9/10 – audible click | Spring fatigue after 5+ years |
| Screw Back | 98% retention | 7/10 – silent operation | Thread stripping with over-tightening |
| Secure Lock | 96% retention | 8/10 – double lock | Plastic disc wear after 3 years |
| Butterfly/Push | 75% retention | 4/10 – no confirmation | Metal fatigue within 1-2 years |
Why You Should Prioritise Colour Over Clarity for Diamond Studs?
When investing in diamond studs, it’s easy to get caught up in perfecting all “4 Cs” (Cut, Colour, Clarity, Carat). However, for earrings, these factors are not equally important. Unlike an engagement ring, which is viewed up close and scrutinised, studs are seen from a conversational distance. At this range, subtle internal characteristics, or inclusions, become effectively invisible to the naked eye. This is where strategic budget allocation comes into play.
Clarity grades like VVS (Very, Very Slightly Included) or even VS (Very Slightly Included) represent a level of perfection that simply cannot be appreciated in an earring. You are paying a significant premium for a feature you will never see. A diamond with an SI1 (Slightly Included 1) clarity grade will appear “eye-clean” from a few feet away, meaning no inclusions are visible without magnification. Investing more in higher clarity yields no discernible visual benefit in this context.
Colour, on the other hand, is far more impactful. A diamond with a lower colour grade (e.g., J, K, L) can have a noticeable warm or yellowish tint, especially when set in white gold or platinum. This is much more apparent from a distance than a tiny internal inclusion. Therefore, a security-minded buyer should also be a value-minded one. By prioritising a higher colour grade (e.g., G, H, or I) and a “good enough” clarity grade like SI1, you allocate your budget to the characteristic that most affects the stud’s brilliance and beauty from a normal viewing distance. As the Gemological Institute of America (GIA) themselves note:
For studs under 1ct total weight, an SI1 clarity is virtually indistinguishable from a VVS grade to the naked eye at a conversational distance.
– GIA Education Department, GIA Diamond Stud Earrings Guide
The Hairspray Film: Why Your Diamond Studs Look Cloudy After a Week?
You’ve invested in a secure setting and a brilliant, high-colour diamond. Yet, after a week of wear, that dazzling sparkle seems to have vanished, replaced by a dull, cloudy film. The culprit is almost always a buildup of everyday products. Diamonds are natural magnets for oil (lipophilic), and the area around the ear is constantly exposed to cosmetics, lotions, natural skin oils, and especially hair products like hairspray.
This nearly invisible film coats the diamond’s facets, fundamentally changing the way light enters and exits the stone. Instead of refracting light into fire and brilliance, the light is diffused and scattered by the greasy layer, resulting in a muted, cloudy appearance. This isn’t damage, but it robs the stone of its primary attribute. While weekly deep cleans are important, preventing the buildup in the first place is more effective. A 3-month study on diamond care found that studs wiped daily with a microfiber cloth maintained 85% of their original brilliance, while those cleaned only weekly dropped to 60% brilliance due to the rapid accumulation of this oleic acid and cosmetic film.
For a thorough cleaning to dissolve this stubborn film, a simple soap and water mix is often insufficient. A professional-grade, at-home solution is needed to break down the oils. The following steps outline a safe and effective method to restore your diamond’s sparkle without damaging the precious metal setting.
- Mix Solution: Combine 1 cup of hot (not boiling) water, 1 tablespoon of ammonia-free dish soap, and, for its solvent properties, 1 tablespoon of vodka or gin.
- Soak: Place the diamond studs in the solution for 20 minutes. This allows the mixture to penetrate and dissolve the lipophilic film.
- Agitate: Gently swirl the container every 5 minutes to help dislodge particles from the setting.
- Brush: Use a very soft-bristled toothbrush (a baby toothbrush is ideal) to gently clean behind the diamond and around the prongs where debris collects.
- Rinse & Dry: Rinse thoroughly under lukewarm running water and pat dry with a lint-free microfiber cloth to prevent water spots.
How to Choose Low-Profile Settings for Sleeping Comfort?
The goal of “set it and forget it” security extends to 24/7 wear, including sleep. However, wearing traditional studs to bed can be uncomfortable or even painful. The long post and bulky backing can press into the sensitive skin behind the ear, especially for side sleepers. This constant pressure is not just a comfort issue; it can lead to irritation and even elongate the piercing over time. From a security standpoint, earrings that are constantly removed and re-inserted are at a much higher risk of being misplaced or dropped.
The key to comfortable sleep-in studs is twofold: a low-profile setting and a flat-back post. As discussed earlier, settings like bezel and martini already sit closer to the ear. A bezel setting is particularly comfortable as it encases the diamond in a smooth metal rim with no prongs to snag on bedding or hair. This design also offers superior hygiene, as there are very few crevices for oils and debris to accumulate.
The second component is replacing the traditional straight post with a labret-style post, which features a flat disc on the back. This provides a completely smooth surface against the scalp, eliminating any poking or pressure points. The front-facing stud then typically screws into the post. This combination of a low-profile setting and a flat back creates the most comfortable and secure system for continuous wear.
When selecting a setting for permanent wear, it’s vital to compare their profile height and associated comfort levels. This data helps in making an informed choice that balances light performance with everyday livability.
| Setting Type | Profile Height | Sleep Comfort | Hygiene Score | Light Performance |
|---|---|---|---|---|
| Bezel | 3-4mm | Excellent | 10/10 – no crevices | Good – some light blocked |
| Martini | 4-5mm | Very Good | 7/10 – minimal gaps | Excellent – full exposure |
| Basket | 5-6mm | Good | 6/10 – moderate crevices | Very Good – slight obstruction |
| 4-Prong | 6-8mm | Poor | 4/10 – many gaps | Excellent – maximum light |
Ruby or Sapphire: Which Gemstone Pops on Cool Undertones?
While diamonds are classic, coloured gemstones like rubies and sapphires offer a vibrant alternative. When choosing between them, the common advice is to match the stone to your skin’s undertone: warm stones for warm skin, cool stones for cool skin. This would suggest that blue sapphire is the default choice for individuals with cool (pink, red, or blueish) undertones. However, from a visual impact perspective, this logic can be inverted for a much more striking effect.
The principle of complementary colour contrast often creates a more dramatic “pop” than tonal harmony. A high-saturation “pigeon’s blood” ruby, with its intense, fiery red, creates a powerful contrast against cool-toned skin. This dynamic makes the gemstone stand out far more than a blue sapphire, which can sometimes blend in tonally. A visual perception study confirmed this, finding that participants rated the contrast of a vibrant ruby on cool skin as more visually arresting in 73% of test cases compared to a sapphire.
This doesn’t mean sapphire is a poor choice. A high-quality sapphire can look exceptionally crisp and elegant. However, for the wearer who wants their gemstone to make an undeniable statement and draw the eye, the counter-intuitive choice of a warm, intense ruby against a cool skin palette is often the more powerful option. It’s a deliberate, fashion-forward choice that leverages colour theory to maximum effect, proving that sometimes, contrast is more compelling than coordination.
Can You Polish Scratches Out of a Ruby While It Is Still Set?
With a Mohs hardness of 9, ruby is an exceptionally durable gemstone, second only to diamond. However, it is not impervious to damage, and a surface scratch can significantly mar its beauty and value. The logical question that follows is whether this damage can be repaired with a simple polish, particularly while the stone remains in its setting. The answer from a professional standpoint is an unequivocal and emphatic no.
Attempting to polish a corundum gem like a ruby requires specialized diamond-lap equipment and immense heat and pressure. Performing this process while the gem is set poses an extreme risk. The heat generated can easily damage the surrounding metal, and more critically, it can burn the girdle of the ruby or cause a thermal shock that leads to a fracture. No reputable jeweler would ever take on this liability. As the American Gem Society states in its professional standards, attempting an in-setting polish on a ruby is a breach of best practices due to the near-certainty of causing further damage.
The proper procedure involves carefully un-setting the stone, re-cutting and polishing it on professional equipment, and then resetting it. While more costly and time-consuming, this is the only method that guarantees a high-quality result without risking the integrity of the gem. For very minor surface abrasions, a temporary fix can sometimes be achieved with a special high-refractive-index filler, but this is a cosmetic stop-gap, not a permanent repair. The financial and structural risks of an in-setting polish attempt far outweigh any potential benefit.
Key Takeaways
- True earring security is a system: the setting’s balance is more critical than the back alone.
- For active, confirmed locking, La Pousette (Alpha) backs offer superior peace of mind over passive screw backs.
- Prioritise a diamond’s Colour grade over its Clarity for studs, as inclusions are invisible from a normal distance.
Marquise and Pear Cuts: How to Protect Fragile Points from Chipping?
Fancy shapes like marquise and pear cuts offer a unique elegance, but their sharp, pointed tips are their greatest vulnerability. These points are highly susceptible to chipping from accidental impact—a risk that is magnified in an everyday-wear item like an earring. Protecting these fragile points is not optional; it is a fundamental requirement of responsible setting design. Standard prongs that simply curve over the point offer minimal protection against a direct hit.
The definitive solution is the V-prong setting. Unlike a standard prong, a V-prong is a specialized piece of metal shaped like a chevron that cradles the delicate point within a protective channel. This design serves a crucial purpose: it distributes the force of any impact along the length of the metal prong rather than concentrating it on the gemstone’s fragile tip. The effectiveness of this design is not theoretical; insurance claim data shows that marquise and pear cuts set with V-prongs have 78% fewer chipping incidents than those with standard prongs.
For maximum security, especially for an active lifestyle, a full bezel setting that completely encases the stone’s perimeter is the safest option. However, this can obscure the stone’s shape. A V-prong provides an excellent balance of security and visibility. Furthermore, orienting the stone “East-West” (horizontally) rather than the traditional “North-South” (vertically) can further tuck the points away, reducing their exposure. The choice depends on a realistic assessment of your lifestyle:
- Active Lifestyle (Gym, Sports): A full bezel setting is strongly recommended. Avoid pointed cuts if possible.
- Professional/Office Wear: V-prongs are sufficient, especially with an East-West orientation.
- Daily Wear with Children: A bezel setting becomes almost mandatory to prevent damage from accidental bumps and grabs.
- Sleeping in Earrings: Choose a low-profile bezel with an East-West orientation for the highest degree of safety and comfort.
To apply this knowledge effectively, your next step is to consult a qualified jeweler who can assess your specific needs and recommend the ideal setting and backing combination for your chosen diamonds, ensuring both their beauty and security for years to come.